Table of Contents
I bet that you’d be really surprised if I told you that that your Chromebook can take ANY type of screenshot you may probably need?
Sometimes when we see something on our screen and want to record that very image, or when we don’t want to write down a bunch of text, or when we want to send someone a picture of what we are looking at on our computer, we need to take a screenshot. It’s the fastest way to take, store, and even send information. You might not always need this feature, but you’ll realize that it’s sometimes vital for whatever it is you want to do.
I’m also willing to bet you didn’t know that there are many ways you can take screenshots. Each scenario requires a different way of capturing what’s on your screen. Each method provides a level of convenience where you don’t need to crop or edit the frame after the fact.
You’re going to want to ask yourself, do you need to capture only part of the screen? Do you need to capture the entire screen? Maybe you want to capture the entire webpage including everything scrolling down.
I’ve needed to do all of these things at some point in my life and on several occasions. I’ve done all the research and found out that Chromebooks can actually take partial screenshots, full-screen screenshots, and webpage captures without downloading any extra software to do so.
There’s no need to download or install any extensions to make this work. Any Chromebook should have the ability to take partial screenshots, full screen captures, and entire webpage captures.
If you are interested in learning exactly how. Follow along to the next section.
Taking a partial screenshot with a Chromebook
- On your keyboard, press and hold CTRL + SHIFT simultaneously
- While still holding, press F5 or the multi-view button on your keyboard
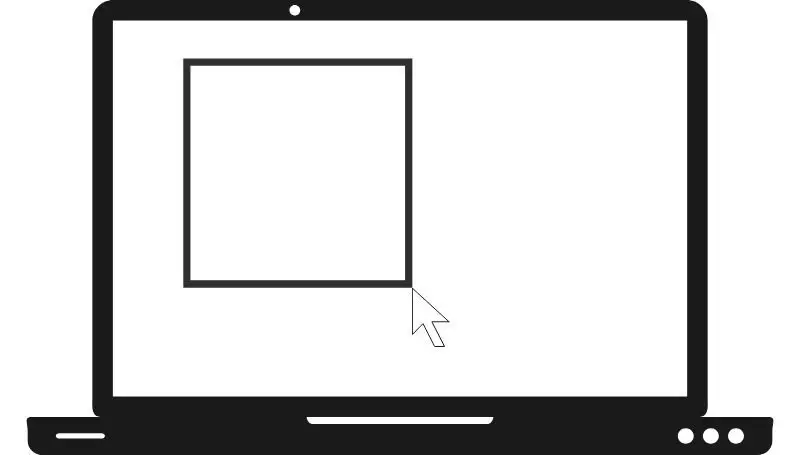
- You’ll see the display dim and your mouse cursor transforms into a target symbol
- Click and drag the box and engulf everything you want to capture

This method is for when you only want to capture a section or part of your screen. What I love about this method is that it saves you tons of time not having to post-process and edit the image. Oftentimes all we want to do is save a portion of the screen, not the entire screen. This is the method I so happen to use the most. Trust me, you’ll love it.
Taking a full-screen screenshot with a Chromebook
- Just press and hold CTRL + either the multi-view button or F5 at the top of the keyboard
Out of all 3 methods, this is by far the easiest. What this does is capture the entire screen. Everything you’re looking at will turn into an image and saved into your computer automatically with the touch of a single button.
This method may be most useful if you wanted to save an entire point in time of what your screen is displaying. You’ll get everything from the background if it’s showing, to the app and bookmark icons at the bottom of the screen, to the tabs on the top of your chrome browser.
Basically, what you actually see is what you get with this method.
Taking a full-webpage screen capture with a Chromebook
- Browse to the page using your Chrome browser.
- Tap on the 3-vertical dots on the top right.
- Then tap on More tools.
- Then tap on Developer tools.
- A new window should slide out from the right with code, click on the 3-vertical dots within this new window (this is not the same 3-vertical dots in step 2).
- Click on Run command.
- Type in “screenshot”.
- Click on Capture full size screenshot.
This is the final and often least used type of screenshot.
I don’t see myself using it much except for the time when I purchased something online the approval page didn’t have a link to download the receipt. One thing I noticed is that the receipt was so long that I had to scroll down a bit to get to the total. So the actual item name and prices were at the top and the total was way down below.
I had no other choice but to use this method. It was certainly a life-saver and a necessary function in Chromebooks.
One thing I want to mention is that this method isn’t exactly the touch of a button or the combination of buttons. It actually requires going into the settings and looking for hidden features. My guess is that Google isn’t quite ready to release this as a public feature to the Chromebook community, so let’s hope one day they do.
This captures pretty much EVERYTHING on the webpage you currently have open. That includes all the comments in an article.
Some side notes and a few things I found out about these methods
After taking a screenshot, where on the Chromebook is it saved?
This is one of the biggest questions I get regarding screenshot saves. Where do the screenshots stay in right after you’ve taken them? Your Chromebook saves your screenshot or screen capture inside your downloads folder. The downloads folder can be located in the files app on your Chromebook.
Don’t worry, every single one of today’s Chromebooks comes with a pre-installed undeletable files app and within that files app is a downloads folder. In fact, everything you save finds its way there unless you specifically change where your file saves into.
An easy way to restart the partial screen capture if you mis-clicked
When doing the first method, the partial screenshot, I’ve found that I have sometimes made a mistake that ends up costing me a little time.
You see, the partial capture method requires a little bit of hand and mouse dexterity skills. If you’re like me and you want to capture exactly and only what is needed, you might run into this issue as well. When I’m using this feature, I sometimes also want to take an even amount of the border around the part I’m focusing on. Sometimes I click, then drag, and then realize that I’ve taken way too much white space or I might have cut off an important part of the subject I’m trying to capture.
The problem continues when now that you realized that if you let go of the mouse hold, the system will automatically save the image you’ve captured into the hard drive of the computer. Now it’s not too bad if you don’t mind going into the folder where that flawed capture is stored and delete it. But to me, that takes time and I’d rather correct the mistake before even making it.
The method I’m about to show you will cancel out the partial screen capture mode right away. While all you’re still dragging your mouse across the image, if you find that you’ve not done a good enough job at it, without releasing the mouse, reach your other hand right over to the ESC button on your keyboard and tap it.
This cancels the screen capture mode right in its tracks and absolutely nothing will happen. The Chromebook will not save your image, it will simply all disappear allowing you to restart the button combination to reenter into partial screen capturing mode.
Capturing a full webpage can take an extra few minutes to process
One caveat I’ve noticed about the third method in capturing a full webpage is that it may sometimes seem like the process is frozen after you’ve pressed the capture button. The reason for this is that there is a ton of information that your Chromebook is processing once asked to scan and save the entire length of the page.
It also depends on how long the page is. Imagine if you were going to do a webpage capture of a popular youtube video. You would have to consider how far down you’d need to scroll to reach the bottom of the comments. It’s going to take you a really long time to scroll all the way down there. This is essentially what your Chromebook will do. It will scroll down the entire page and record every single aspect, every image, and every text and it will save it all into one file.
The point of what I’m trying to say is, be very patient. It is working in the background even though it’s not telling you it is.
Also, whatever you do, don’t close out the developer tools menu. Closing it will cancel the saving process and you’ll be left with nothing. There will be no download of the webpage and you’ll have to restart the steps starting at the 3 vertical dots and looking for run command.
A page that was about 5 feet long took my computer roughly 25-30 seconds to fully save. The image size ended being relatively big for a screen capture but that’s because it was much, much more than a simple screen capture.
