
Table of Contents
Chromebooks are simple devices but they have a lot of customizable features. If you own a Chromebook, chances are, you’re not buying it for its touchscreen features. My bet is that you’re using it for work, browsing, productivity, and media consumption. Most portable Chrome OS devices are in laptop form and come with a traditional keyboard and touchpad. That’s why you might have no need for some other forms of input.
For example, take the built-in touchscreen. You might find yourself never using this feature and want to know of a way to turn it off.
But the question here is, can you turn off and on a Chromebook touchscreen?
Yes, you can. Google put an option deep into Chrome OS that allows users the option of turning on and off their device’s touchscreen. This method works by changing the settings inside your Chromebook’s debug settings and then pressing Search + Shift + t on your keyboard.
The process can be a bit confusing at first, but I’ve created a super simple article on how to do this.
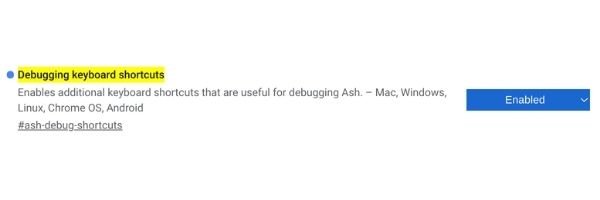
Step 1: Enable debugging keyboard shortcuts
The first thing you’re going to want to do is to enable a setting in your Chrome browser. The Chrome operating system allows us access to change a multitude of settings from within the Chrome browser.
- Open Chrome.
- Type in chrome://flags/#ash-debug-shortcuts to the address bar.
- Look for Debugging Keyboard Shortcuts.
- Tap on Enable.
- Restart your Chromebook.
This will open the option for your next step which will simply toggle the touchscreen on and off.
Step 2: Toggle your touchscreen on or off
Now that you’ve enabled debugging, you will have access to short key combinations that will allow you to change the behavior of your Chromebook.
- On your keyboard: Search + Shift + t
Nothing visually will really happen. The only thing you might see is that your mouse arrow disappears. But that’s it.
This keyboard combination is more like a toggle. If you use it once, it will turn off the touchscreen, if you do it again it will turn it back on.
Test to see if you’ve successfully turned your touchscreen on or off by touching the screen. If it doesn’t respond to your touch, then you’ve successfully turned it off. If it does, then you’ve turned it back on.
Problems with accessing Chrome browser debugging
In many cases, the main reason why you wouldn’t be able to access the Chrome browser debugging menu is that you’re not signed on as an administrator.
In this situation, it’s best to ask your administrator to allow you access or even turn on the option to toggle your touchscreen on and off.
If you happen to be the administrator, it could be that you’re not logged in as the administrator. Administrators are often the first users to log into your Chromebook. Everyone else is not.
Many times, Chromebooks that are lent to parents of students are restricted from changing any of the settings in that Chromebook. In this situation, the administrator will most likely be the IT department that works with the school.
Be sure to contact them. There’s a likely chance that the school or business’s IT department had disabled these options including the powerwash option so that you wouldn’t mess with the settings.
How to fix Chromebook Touchscreen not working
Sometimes when you’re Chromebook touchscreen isn’t working, it’s likely due to your screen being dirty, your touchscreen was accidentally turned off, or your computer has some software or hardware issue.
Step 1: Clean your screen
Start by cleaning your screen. Wipe it down gently with a non-abrasive microfiber towel. The towel should be slightly damp, but not too wet.
Scrub your screen down in a downward or side-to-side motion. Make sure all the dust is removed from the screen.
If this doesn’t work, move on to step 2.
Step 2: Turn on and off your touchscreen
The steps above I’ve mentioned give you a detailed step-by-step approach on how to do this.
What I recommend here is to try and toggle the touchscreen on and off a few times while testing the results in between.
See if you can get the screen to respond to your touch at any point in toggling it.
If this doesn’t solve your issue, it might be a software or hardware failure.
Step 3: Remove your screen protector
Sometimes, it’s important to understand that your touchscreen digitizer can only respond to touch up to a certain length. Placing a heavy and thick screen protector on top of your screen may dampen or hamper the responsiveness.
This might result in the touch screen just not working. I recommend removing this screen protector.
Step 4: Your Chrome extension might be the issue
Sometimes, it might be the extensions that you add into your Chrome browser that might cause this issue. It’s especially true that touchscreen issues occur when that extension alters the behavior of the screen.
But if you don’t know where to begin, try removing one extension at a time. You might even have to restart the Chromebook through each process.
Don’t worry, you can easily re-download the extensions that are not the culprit. Make sure you take notice of which extension doesn’t work and when you find it, just try to find an alternative in the future.
Step 5: Powerwash your Chromebook
Powerwash is also known as a factory reset for your Chromebook.
Before you do this, make sure all your data is backed up. Chromebooks aren’t known for putting your data directly on its hard drive, but you never know.
Pictures and screenshots and downloaded files may likely end up in your download folder, so I would suggest you look through it one last time to see if you need to hold onto something. Make sure you store it somewhere safe.
When all is good, let’s go ahead and restore your Chromebook.
- On your Chromebook, go to your Settings.
- Scroll down and click on Advanced.
- Under Reset settings, click on Powerwash.
- Click on Restart.
Once your Chromebook comes back on, sign in with your Google account and follow the on-screen prompts to set up your Chromebook.
At any moment, you can test your touchscreen to see if it’s working. The factory reset should have restored all your Chromebook settings back to when you first opened it from the box.
For an in-depth tutorial on all the different ways you can factory reset your Chromebook, I’ve found this great guide from Google on how to powerwash your Chromebook.
If you’re still finding that your touchscreen is not working, then you might have a hardware problem.
Chromebook hardware issue
If you’re facing a hardware issue, then your best hope is to call in the warranty and get it repaired or replaced as soon as possible.
It’s quite possible that the touchscreen cord that hooks into your motherboard might be loose which may explain why your touchscreen isn’t working. Touchscreens often have their own separate connector aside from the display. If it comes loose, there’s a high possibility that it will stop working.
Fixing this issue would require unscrewing the Chromebook device and getting inside where the motherboard meets the ports under the display. This is a tedious task and should only be left to professionals in case you’re not familiar with this.
If your device is no longer warranted, I recommend calling the manufacturer and asking if there’s an out-of-warranty option for repair.
You also have the option of taking the Chromebook out to a third-party computer repair center and they might be able to repair the issue, saving you some cash.
One thing, I want to mention is that if the Chromebook is indeed a device provided to you by your school, contact your IT department first. They often warrant the device and the cost of repair might not be your responsibility. It might be a free repair.
The bottom line
While most Chrome OS devices come as Chromebooks with touchscreen, having issues with the touch screen can be really frustrating. There are a multiple amount of reasons why your Chromebook’s touch screen might not be working so well.
Fortunately, there are several steps you can take to rectify this issue.
Other related articles: