
Table of Contents
This may be silly to you but creating a column in your Google Docs can sometimes be a challenge. But I’m here to help you.
Let’s get to the point. Can you create columns in Google Docs?
The answer is yes. Google Docs has made it very convenient to simply add columns to your document. With just a few clicks, you can create almost any number of columns you choose and customize it by changing the margins and the gaps in between the columns themselves.
If you’re looking to making a lot of columns so that your documents will be easier to read and more structurally organized, this article is going to be for you.
How do you create columns in Google Docs?
- Go to Google Docs.
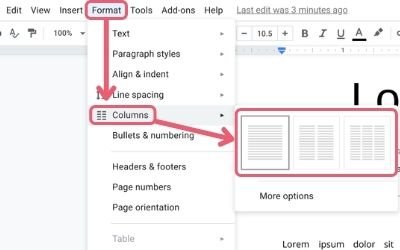
- Go up to the menu bar and click on Format > Column.
- Select the columns you want.
But are there other ways to make columns? How do you make several columns? And what other options does Google Docs provide when it comes to creating and adding columns?
In this article, I’m going to go over absolutely everything you need to know about columns in Google Docs.
What other options are there in Google Docs columns?
If you made it to the final step to select your columns, you might have seen that there’s another option at the very bottom called More options. While there are not that many, Google Docs gives us a little more fine-tune controls here.
You’ll find that you are able to change the number of columns, create how much spacing between each column, and a line option.
Number of columns
Google Docs allows you to create up to 3 columns at a time. And unfortunately, here you can only create a maximum of 3 columns at a time on one sheet. There’s really no way around that.
It’s unfortunate because sometimes we want to turn the sheet in landscape and the canvas will be quite a bit wider. Even if you tried to change the paper into something larger in your page setup, you’ll find that you’re limited to only 3 columns max.
Spacing between columns
Google Docs also allows you to put in exactly how much spacing you need in between the columns. This space works to separate your column content so that the reader can better differentiate the divided sections.
The spacing is calculated in inches and you are actually limited to putting in up to 2.5 inches in between each column if you have 3 columns and 5.5 inches if you opt-in for only 2 columns.
One thing I did notice was if you changed the sheet from a regular 8.5 by 11 paper, into something larger, you get more spacing options. The inches can go beyond 5.5 inches. However, even if you have a wider form, you can’t increase the maximum number of columns.
Add a vertical line in between columns
One last option you have in this menu is the ability to add a verticle line in between columns. It’s just a check box.
Other than that, there’s really no way to customize or change the pattern of the line or color.
How to properly move on to the next column
Sometimes you’ll notice that you’re done with one column and ready to move on to the next. You haven’t filled up enough text or words in the first column. So how do you move onto the next if there’s a huge blank bottom column still untouched?
The wrong way to move to the next column
Most people who don’t know will automatically think if they just repeatedly press the enter button multiple times to go down the line, eventually they’ll get to the next column. It’s a clever trick that works, but it comes with some serious disadvantages.
For one thing, it takes time and it’s a bit sloppy. Depending on how much content you have in that column, you might have to tap on that enter key several dozens of times.
Another issue with that method is the fact that those enter lines exist in the invisible space. Sure, the reader won’t even notice, but if you as the writer decide to go into the columns to add or take away any content, you’ll notice that the rest of the columns start to behave as if they were linked to all the spaces. Deleting content might pull the words from another column up and even over to the left column while adding content might push the words on another column to go down or over to the next column.
The right way to move to the next column
Now, the right thing to do is a feature in the menu option called Break column.
- Once you’re done writing in one column and ready to move onto the next one.
- Hang your cursor at the bottom of your content.
- Go to the menu bar.
- Click on Insert > Break > Column break.
This method is quick. It doesn’t add extra invisible lines that can be accidentally changed. Also, if you’re looking for quick keyboard shortcuts, you can find them right here on Google’s official how-to site.
How to make columns different sizes in Google Docs
There’s no direct way to change the columns individually. For example, if you’re trying to make the first column a different size from the next column, changing the width of one column will automatically change the width of all the other ones.
However, there is a way to get around this. You’re going to have to use Indent markers. You can see these markers. These are tiny little blue icons located on the rails of the ruler above the document. You’ll find that there’s a First Line Indent, Left Indent, and Right Indent.
For the purpose of manipulating the column’s content, I would recommend simply moving using your mouse, clicking on either the Left Indent or Right Indent, and dragging it in whatever direction you want. These Indent markers basically push your contents even further (think of adding spacing for columns) but only to the column, you’re focusing on. It doesn’t change the indentations of the other columns.
How to manage columns in Google Docs on your smartphone
You can’t add or delete columns while using your Android app or iOS app. The only thing you can do here is to edit the texts that are in between the columns.
Fortunately, the mobile version of Google Docs has line indicators that show up letting you know where one column begins and ends.
One thing you MUST know if you want these column lines to display is that they are created due to the Column break feature. If you don’t use the Column break feature, you won’t see any lines. The column must also have text in them. If there is no text then the line indicator will not show either.
There is one issue that you may find on the mobile version. It might be a software bug or something that Google just forgot to implicate. If you were on the smartphone version, and you just so happen to delete all the way back to another column, then that column indicator would disappear. It won’t show up again. You actually won’t know which column you’ll be on because of this. The only way to fix this is to go to the desktop version of Google Docs and add this column back in. If you were on the smartphone version, and you just so happen to delete all the way back to another column.
Can you create a column within a table?
The answer is no. You cannot make columns within a table. However, you can make a table inside a column.
How to switch back to one column
Going back to one column is pretty easy. Simply go back to the menu bar, click on Format, then Column, and select a lesser column.
So what happens if there’s text still in the column that you eliminate? It ends up on the next page.
How to create multiple columns in one document
If you’re stuck with trying to figure out how to create multiple columns in a single document, there’s a specific method to this. The answer is using the Break features located in the Insert menu in combination with the Format > Column options.

What you want to do here, is use either Page break or one of the two Section break options to “break” out of the current column you’re working on. However, you’ll notice that as you begin to type (after breaking the page), your text will continue following the previous column option.
In order to disable the column in this new break area, simply go back up to Format > Column and lessen or set your page format back to single column. You may now continue to type across the entire document.
At any point if you are wanting to create another column (whether it be 2 or 3 columns) moving forward, you’ll have to use the Break option again to “release” yourself from the single-column mode. Then go back to Format > Column, and then choose the number of columns you please.
The emphasis on creating multiple columns in the same document has to do with understanding that every time you use the “Break” feature, it basically takes you out of whatever format setting you are currently in. With that in mind, you can do any combination of formatting separate from each other to produce a good looking paper.
The bottom line
If you are on the desktop version of Google Docs and you want to make columns, go ahead and use that feature if you want. When Google Docs was first introduced, column creating had to be hacked. And there were quite a few methods on how to fake columns into a document. That has all changed. Google has now conveniently added the feature through just a few clicks.
There are many features to this column feature that you might find convenient and some that are still limiting.
I believe it’s acceptable for now. Google Docs doesn’t seem like it was built for the professional who needed extreme customizability. Fortunately, this feature is widely acceptable in all it’s merits.
Other related articles: